Facebook ads can be a great way to get your books in front of new readers and make more sales. While Facebooks ads aren’t easy to run effectively—they require periodic tweaking, refining, optimization, and refreshing—they also don’t take a lot of extra time. Especially once you’ve finished the work of testing multiple ads and audiences to determine what works well for you.
What Are Facebook Ads?
Facebook ads are images or videos paired with text and a call to action. They can be used to advertise a variety of things, including your books!
A Facebook ad is made of a couple components: you first have a campaign, inside the campaign are Ad Sets, and in each Ad Set are the actual Ads.
With Facebook ads, you can target specific audiences and choose what you want to spend. The ad can also be placed in different locations, such as Facebook News Feed, Facebook Marketplace, Search, Facebook Group Feeds, and more. However, the ads located in the main feeds and stories are the ones that perform best. These ads are a great way to reach new readers and potential fans.
How Do I Use Facebook Ads to Advertise My Books?
You can use these ads several different ways! Here are a few ideas:
- Book launches
- Book promotions/sales and giveaways
- Permafree books (such as book 1 of a series)
- Cross-series retargeting (you advertise to people who have seen book 1 of your series in a Facebook ad with book 1 of another of your series in a similar genre)
- Subscriber magnets (giving people a free ebook in exchange for their email address)
- A blog post that offers value and leads readers to sign up for your newsletter
So, how do you make a Facebook ad? Let’s dive right in!
Before Starting
There are a couple things you’ll need to do before actually setting up the ad on Facebook.
Make an Author Page
If you haven’t created ads on Facebook before, you’ll need an ads account, but to get that, you’ll first need an author Page on Facebook. Even beyond running ads, having an author Page is a good way to establish a professional brand. With an official Page, you can also schedule posts, making managing your social media presence much easier.
Make a Landing Page
You’ll want to create a landing page on your website that your Facebook ad will send users to. This is often better than linking directly to Amazon for a couple reasons:
- Not everyone buys ebooks from Amazon, and your ebook may be available at other retailers.
- You can better track clicks and sales from a landing page on your website (because it is against Amazon’s terms to use an affiliate link in a social media ad).
- You can offer additional value on a landing page than just the book. (Hint: giveaways, newsletters.)
- A landing page can show how wonderful your book is better than an Amazon listing can (Amazon’s true goal is to sell their stuff, not yours).
However, the more steps it takes for your audience to get to the final purchase of your book, the more drop off you’ll experience between each step. For example, let’s say your Facebook ad sends 100 people to your site: some of these people may immediately click away and not look at your page at all, some may look and decide they don’t actually want the book you’re offering, some may not like the retailer you’re selling on, and maybe only 20 will go on to click through to the retailer page. Of those 20, some may still not purchase a book. If you have even more steps and page that people need to click through to get your book, you’ll see some drop off between each step. For this reason, landing pages will have the best conversion rate when your book can be purchased or downloaded directly from your landing page. Oftentimes, though, linking to a retailer pages can’t be avoided, but when they can be, they should be. The most important thing is that your campaigns are concise as possible and that you eliminate all unnecessary steps for the best conversion rate and cheapest results.
The landing page should be eye-catching but with a clear call to action—like a clear download button or signup form, or obvious purchase buttons for the different retailers that readers can buy the book from. If you’re running a giveaway in conjunction with the book promotion, then the giveaway signup would also be on that page.
Don’t confuse the objective of your page. If you want to sell books, everything on your landing page should point to selling your books until the very end. If you want to get more signups for your newsletter, everything on your page should point to signing up for your newsletter. If you want to grow your social media accounts, then everything should point toward growing your social media accounts. Oftentimes, we see people try to get everything on one landing page, thinking this is the best way to maximize their ad spend. They’ll have multiple offers and actions that users can take on the page. When this happens, users will often feel overwhelmed and click away or take some actions, but quite possibly not the action that is the most important to you. Take your users through one clear step at a time. If you want them to buy or download your book, have them purchase the book first, then ask them to follow you on social media or join your newsletter once the book is purchased.
Research Your Target Audience
It’s now time to start brainstorming about your target audience.
- How old are they?
- What are their hobbies?
- Where do they spend time online?
- What topics are they interested in?
- What authors in similar genres do they read?
Facebook has a pretty robust and detailed targeting system, but they only allow you to target categories that are fairly general or popular. For example, if you want to target other fantasy readers, you can target the fantasy genre and perhaps a couple of the most popular fantasy genres, but if you’re trying to target middle-tier series that are more closely related to your book, you probably won’t be able too.
You can also add levels to your targeting. For example, say that you are only looking to sell your ebook and don’t want to show your ad to those readers who will only read physical books. So, in this case I’d set up a layer to target behaviors, those who have ereaders or are interested in ebooks or kindle books. This will help weed out readers who only read physical books. Then, in another layer of targeting, I’d add in the interests—this would be like the genres your book relates too or other similar series and authors.
Try to think outside the box when it comes to targeting your readers. Try to determine what things would set a reader who likes your books apart from another reader. For example, if your book is a Pride and Prejudice variation, then your readers have a higher chance of using fan fiction sites or Kobo, so you could try adding those into your targeting. Or, if your book deals with a specific topics, try adding that topic into your targeting so long as you already have a layer set up to ensure you’re only targeting readers.
I usually keep age ranges and demographic areas as wide as possible when I first set up an ad. After your ads have run for at least a week and you feel like you have a good initial pool of data to pull from, start trying to narrow down your audience to the highest converting and cheapest members. Look at the age ranges that are converting best, and eliminate the more costly groups. Are there states or countries that are performing better? Keep them and remove the more expensive ones. Continue looking through the data and narrow it down where possible. You might be surprised that your audience is slightly different than you initially thought.
The exception to this rule is narrowing down by gender. Even it if appears that one gender is getting you cheaper results than another, I’ve always found that turning off one gender significantly increases your ad cost. So I’d recommend always leaving all genders on.
Typically, I find that audiences that are at least 2 to 3 million large work best. Too small and you won’t have enough people to show your ad to and your ad cost will increase. Too large, and your targeting will be too wide and you’ll have poor conversion rates, which equals more expensive ads even if your initial cost per click looks good.
Finally, you’re always going to have to keep tweaking and updating your audience. Audiences get exhausted after a while. If you don’t keep updating and tweaking your audience, then your ad prices will slowly increase as your run out of people to show them too. Changing up your audience can add new people to your pool and keep your ad prices lower, so even if you don’t use all your targeting words at first, keep track of all your audience research in a spreadsheet so you can pull from it later.
Creating the Ad
Now it’s time to create the ad images and write the associated text.
Create Your Ad Images
The main part of your ad is the image. You’ll want to choose an image that appeals to your audience and makes them stop scrolling, since ads most often appear in the News Feed. If you’re promoting a book, the image should match the genre and tone of your book. If you’re promoting a blog page or a giveaway, the image should match your author brand and the genre you write in.
You can add text to the image that encourages readers to buy, such as a (very!) short review comparing it to a popular book, or a short description. This text should be short—it’s a tagline to catch a person’s attention, not to convey a lot of information. Canva is a great tool you can use to add text to images.
If you’re advertising a book, your ad image should make it clear that it is a book you are offering. This can be done by using your book cover as the image, or by using the word “book” in the tagline you added to the image.
Because the image is the main part of the ad, you’ll want to make a few different images that you can test out in your Ad Sets to find which performs the best.
Facebook recommends making your images square, at 1080 x 1080 pixels.
Write Text to Go with Your Ad Image
Now it’s time to write the text that’ll go above your image, called the Primary Text. This should let viewers know more about what you are offering. Here are a couple options you can try:
- A short, intriguing passage from your book, followed by the book name, and then an invitation to buy/read (“click to buy,” “start reading now,” etc), with a link to the book on the invitation to buy/read.
- A short, interesting description of the book, followed by a reviews, and then an invitation to buy/read, with a link to the book.
- A couple descriptive reviews of your book, and then an invitation to buy/read, with a link to the book.
Next, write the Headline, which will appear below the image in bold text. This text should be kept very short. If your book is on sale, this is a great place to mention the sale (for example, “FREE this month only!”). If this isn’t a sale, then you can use a short review, or compare your book to another book (“If you enjoyed ___, you’ll love ___!”)
For now, just put this text into a spreadsheet, so you can plug it into your ads later. If you have a few ideas you want to try, include them all in your spreadsheet.
If you don’t feel like you need to add text in every spot in order to get your message across, then don’t. You don’t need to use every text space Facebook offers. In fact, it’s better to leave one off than to make your ad seem repetitive and unnecessarily wordy, which is why we only mention the Primary Text and the Headline fields, even though there are a lot more options than those. Clear and concise ads have the best chance of success.
Setting Up Ads Manager
Let’s get into Ads Manager now. From your Facebook feed, click on “Ad Center” on the left pane and then click “all ads” underneath it.
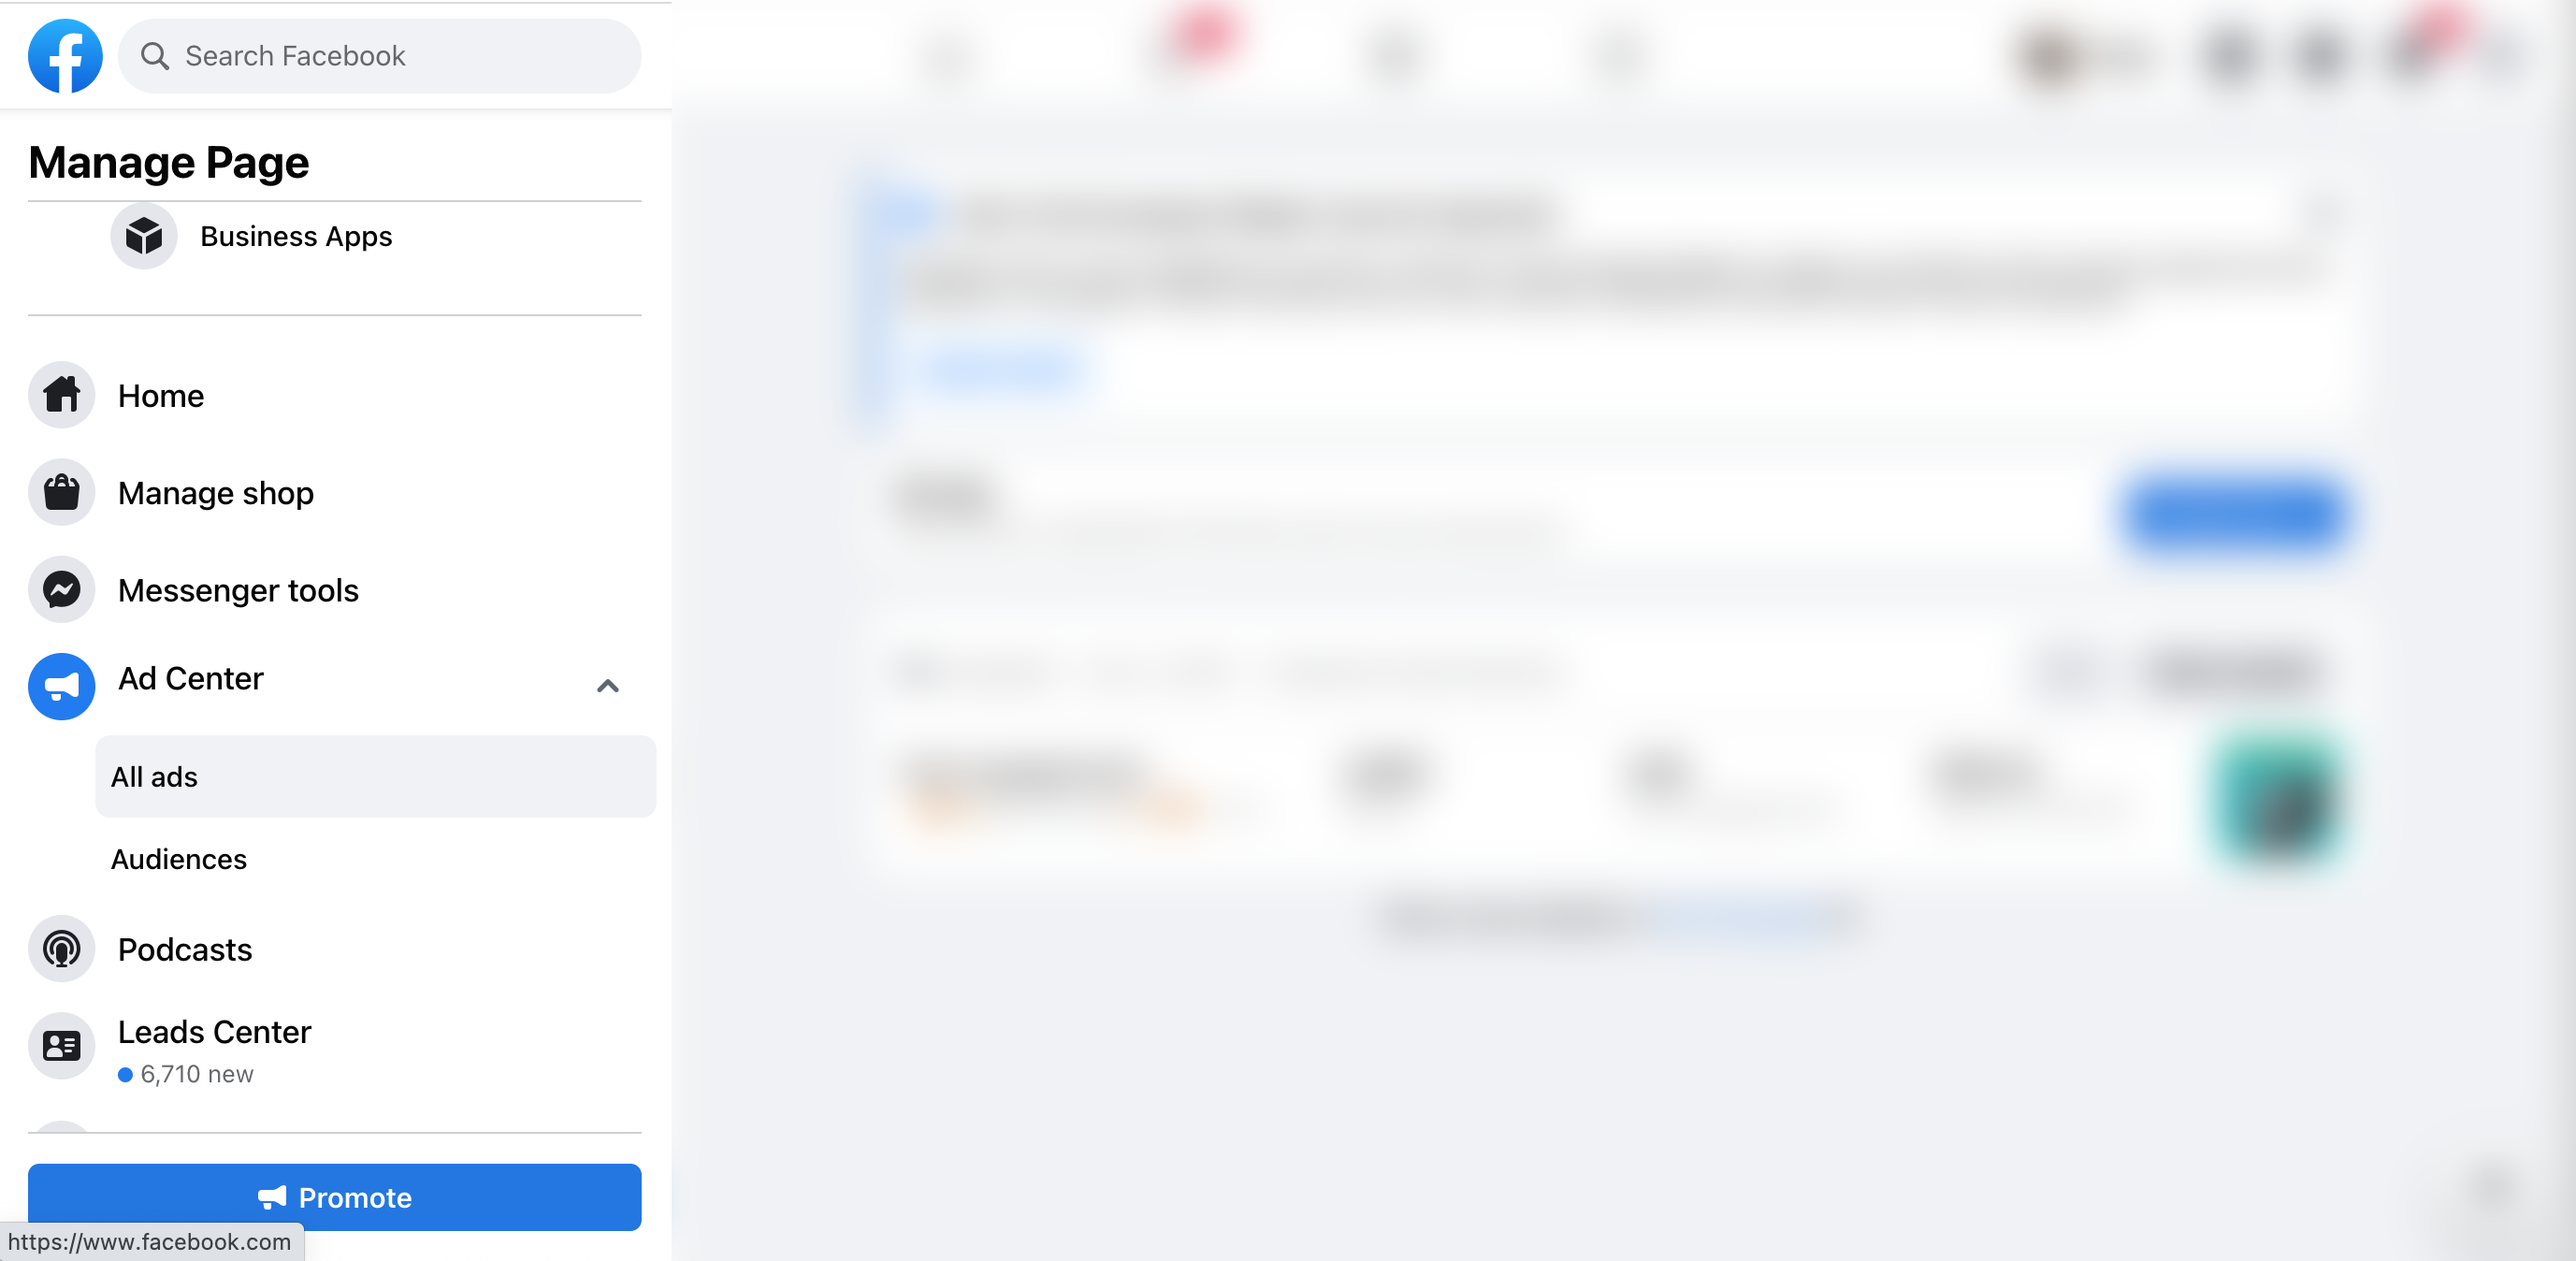
On the bottom of that page that opens, click the link to “Ads Manager.” This is the page where you will set up your ads, so feel free to bookmark it for easy access later.
If this is your first time using Facebook Ads, you’ll need to set up your billing information. Click on the menu icon on the left, then click “Billing.”
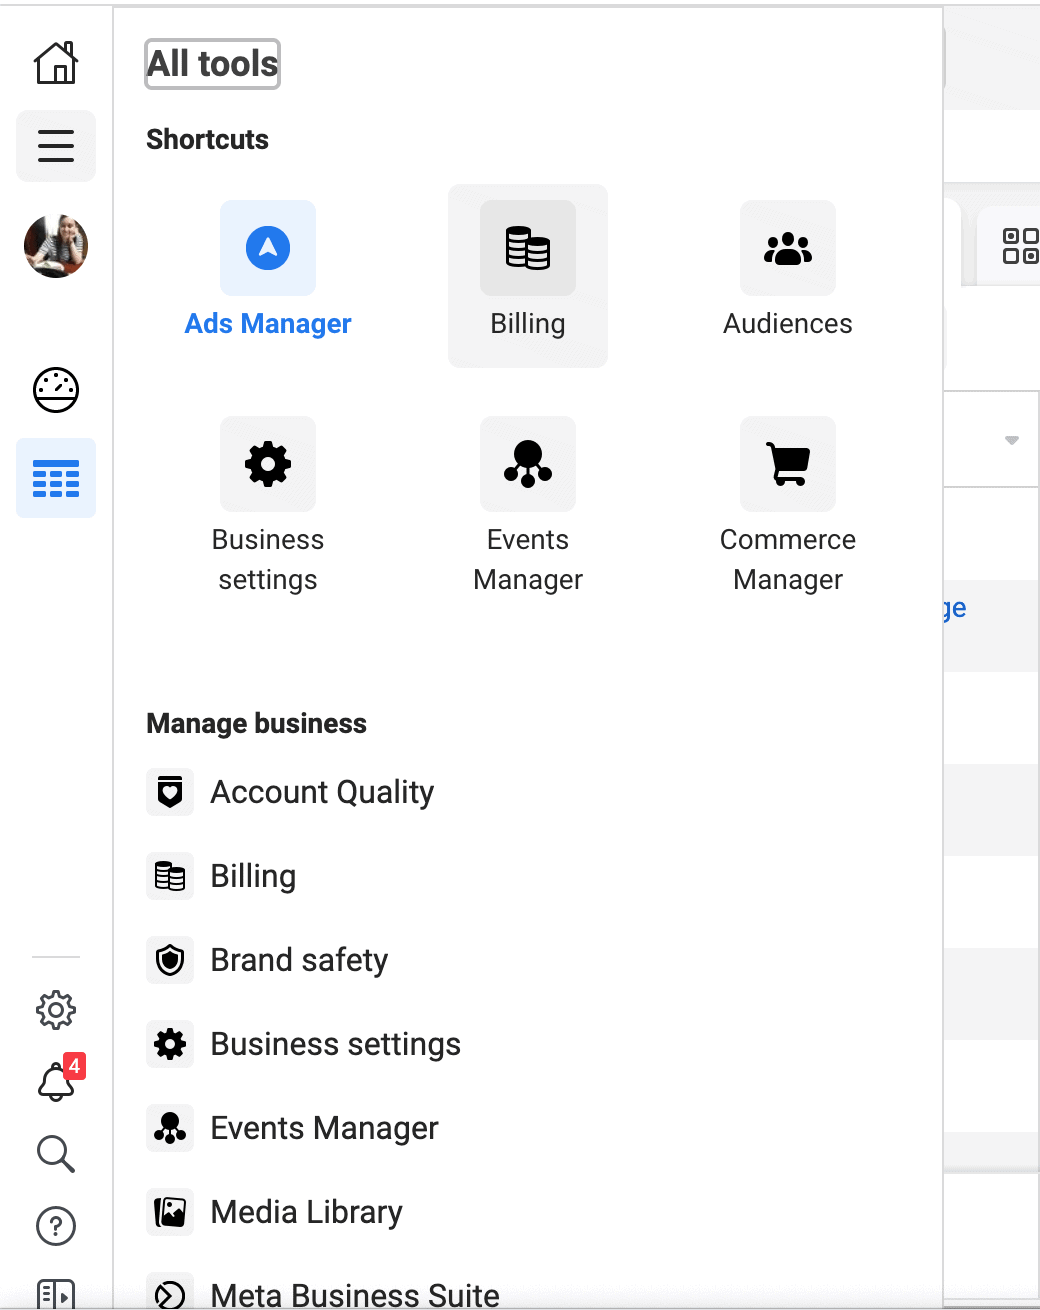
On the page that opens, click “Payment settings” on the top right, then add your payment information on the next page.
Setting Up the Facebook Ad
Campaign Setup
It’s time to actually set up that ad! In Ads Manager, click the green “Create” button at the top left. Choose your Campaign Objective. “Traffic” is usually what you’ll want if you’re looking to send readers to a landing page, but “Lead” ads can be useful if you’re looking to gain newsletter signups, and even “Engagement” ads can be useful if you’re interested in hosting a giveaway to grow your social media audience. However, since we’re mostly talking about promoting your book in this article, we’ll stick to Traffic ads for our example below.
On the next screen, give your Campaign a name that will help you recognize it later, like the book title + the audience targeting you’ve chosen.
Now we set your budget. There are several different places where you can do this; the first is to set a Campaign cap. Under the “Campaign details” section, click the “show more options” drop down and add a “Campaign spending limit.” Having a Campaign spending limit means that throughout the entirety of your campaign, you won’t spend more than this amount. I suggest always setting this limit, even if you’ve set up your budget elsewhere, because it can save you. For example, I once knew a person who accidentally spend $20,000 one month instead of the $2,000 they budgeted, because at some point someone added an extra zero to their Ad Set. If they’d had a Campaign budget set up, this wouldn’t have been able to happen, even though the numbers were set incorrectly. You can always increase the Campaign spending limit later if you need to.
You can also set a daily budget. To do so, turn on “Campaign Budget Optimization”; this option will distribute your budget across the Ad Sets of your campaign to get the best results. When you’re still trying to figure out what ads and audiences will work for you, starting with a little bit of a lower budget, like $10 a day, for a week, will allow you and Facebook to collect enough data to expand that budget profitably later.
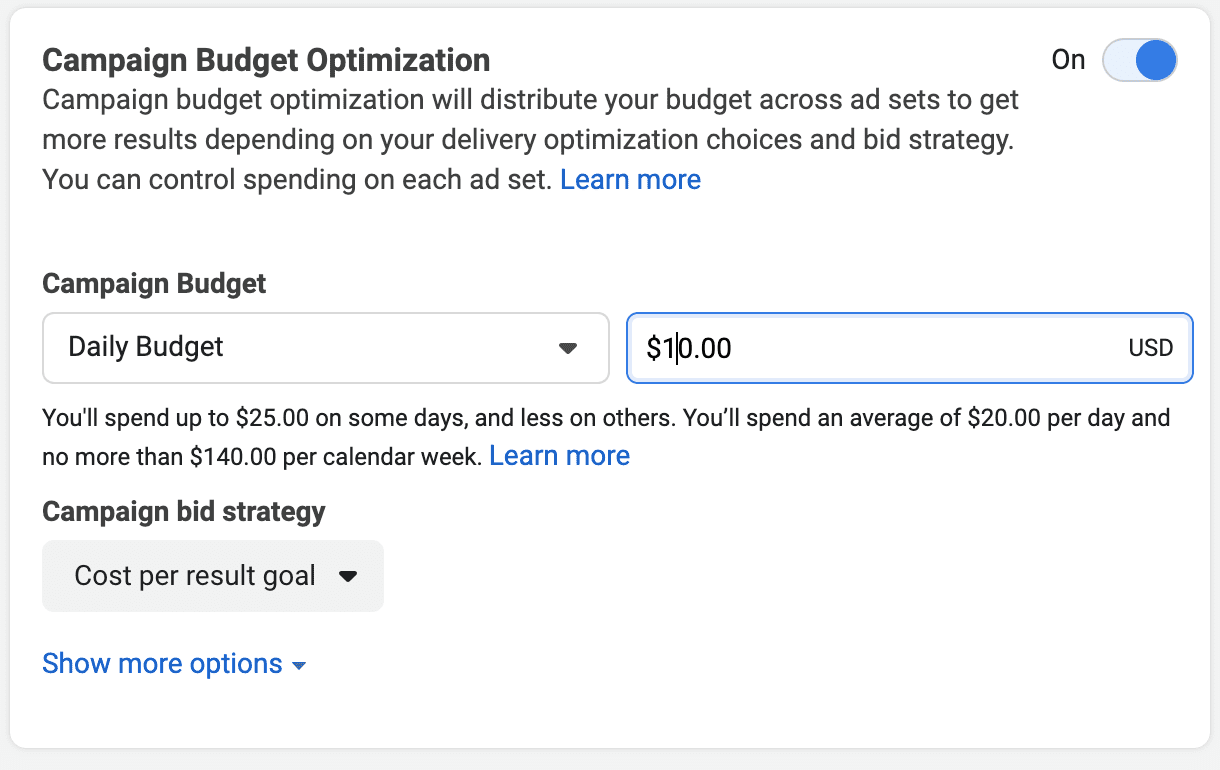
Finally, you can also set the “cost per result goal” (to see this option, click the edit button next to “Campaign bid strategy”). This tells Facebook that you don’t want to spend more than this dollar amount per click (or other objective if you’ve chosen a different type of ad). If you don’t set this up, you may end up spending a lot per click—more than you think the click is worth. Once you choose the “cost per result goal” option on the campaign setup, you can put a dollar amount in on the next screen (we’ll get into this at the next step).
Also, a note on scaling ads. Oftentimes, when we see an ad doing well, we want to pour more money into that ad. We think that if we increase our budget, we will get a lot more results at the same price. However, this isn’t true. If you start a campaign at $10 dollars a day, see it’s performing well, then increase it to $100 dollars a day, then you’ll likely see that your campaign either doubles or triples in cost per result, or won’t spend completely out. I suggest scaling your ad slowly, by five or ten dollars every couple of days, to keep your results and cost under control.
Ad Set Setup
Now it’s time to set up an Ad Set. Ad Sets are just different audience groups, so give this Ad Set a name that represents the audience you are targeting.
Leave the first few settings as is (“Traffic” is “Website,” “Dynamic creative” is off, “Optimization & delivery” is set to “Link clicks”).
If you chose “cost per result goal” in the last screen, you can now input your dollar amount in the “Optimization & delivery” section under “Cost per result goal.” I usually set the cost per result cap low when I start ads, say $1. If it’s set too low, Facebook simply won’t show your ad. If my ad isn’t being shown, I increase the cost per result by ten cents a day until my ad starts showing and spends my daily amount. Usually, most people need to spend around $1.5o per click. Good campaigns can get clicks for a dollar and under and bad campaigns can spend over five dollars a click. More expensive products also usually see more expensive costs per click. However, since we’re talking about books, I’d be surprised to see more than $10 a click even for a poorly put together ad.
If I end up increasing the cost per result to the maximum that I’m willing to pay and my ads still aren’t showing, then it means that either I need to reevaluate my targeting, objective, or budget to see if Facebook ads are a good choice for me. Don’t be discouraged if one campaign is a bust. It often takes several attempts until you get it right.
The next settings are “Budget & schedule.” If you want your ads to start automatically at a future date, you can schedule a start date and time. If you have a hard end date in mind—for example, a book sale or giveaway that will end, make sure to set an end date at this point as well. If you just want to run your ad until it no longer performs well, then you don’t need to set this.
Now it’s time to put in your target audience. If you’re just starting out, choose the United States as the location. You can also choose an age range and gender, but when first starting out, it is best to leave these broad.
The power of Facebook ads comes in with the “Detailed Targeting.” To get to these options, hover on the right side of Settings and click the Edit link if you haven’t done so already.
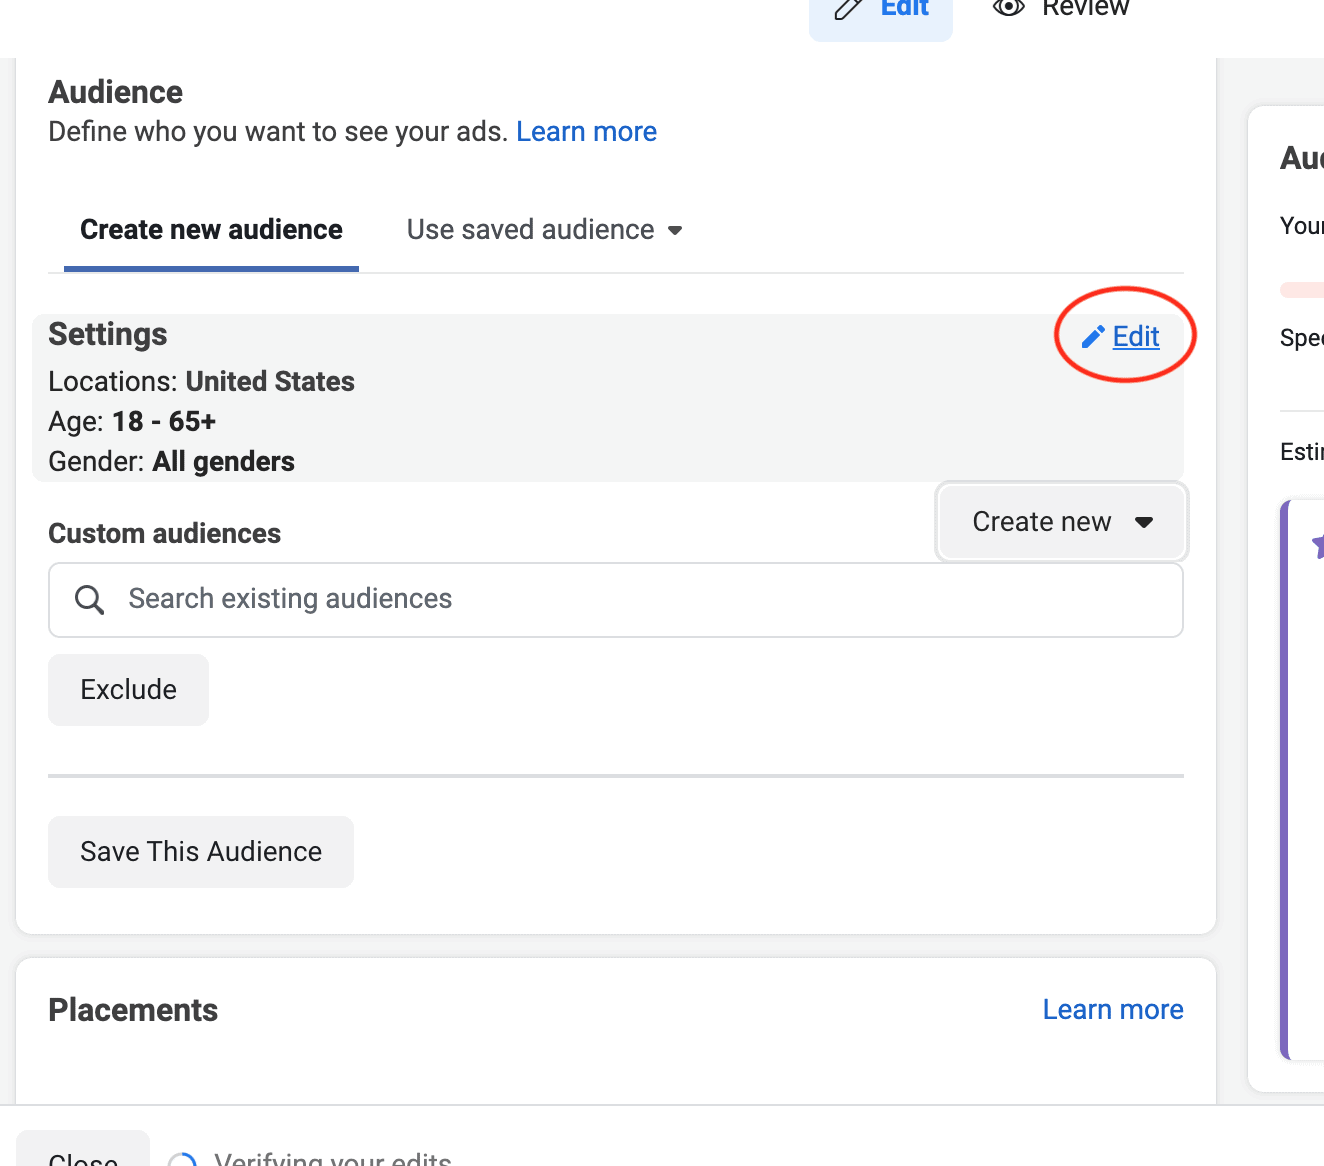
Then click “Show more options.” Now you can click the Edit link next to “Detailed Targeting” to add one of the audience you researched. Type in one of your target audience ideas into the bar to add it. Again, when first starting Facebook ads, it’s better to start too broad than too narrow. Once you have an idea of what works after a couple days, you can further refine your audience.
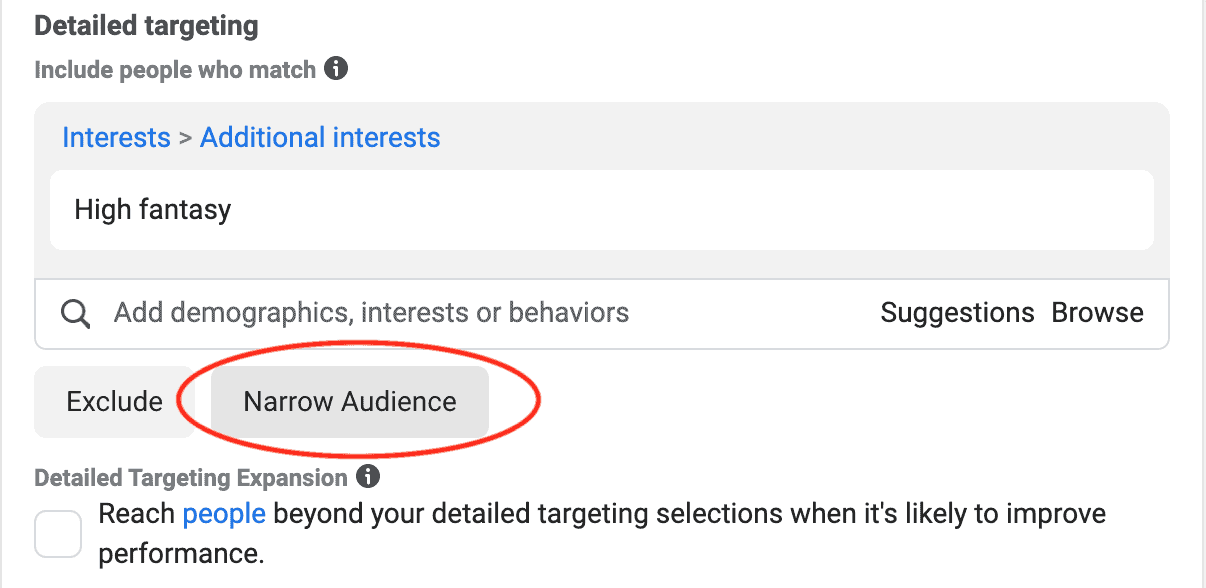
Now click the “Narrow audience” button under “Detailed Targeting” and add ebook-related keywords, such as Kindle, Amazon Kindle, ebook, and Kindle Fire. This will help target people who are interested in ebooks, on top of being inside your main target audience. (Note: be sure you’re narrowing by “interests” and not by “employees” or something else).
Next, it’s time to set your ad placement options. I strongly, strongly suggest not leaving this as automatic placements. There are some Facebook placements that perform much better than others. Also, many different placement options require different ad creatives, both in size and style. If you leave automatic placements on, then you risk having your ad awkwardly cropped or with added white space around it. Instead I suggest picking the placements you’ve created your ad for. For example, these are the placements I use most:
- Facebook or Instagram: Facebook typically sees a cheaper conversion rate for me. Remember these two platforms are very different with different objections. If you run ads on both, you should be running two different ads that are optimized for each platform’s strengths. Within these sections, I will commonly use these options:
- Feed
- Stories and Reels
The rest of the targeting options can be effective but require ads created specifically around their placement. When you’re starting out, I’d recommend mastering these common placements first.
You’re ready to move on. Click “Next”!
Ad Setup
It’s time to set up an actual Ad! Name this Ad with the name you gave your Ad Set and a number, so you can easily recognize what it is and where it belongs later. The number is because you’ll want to set up a couple different ads in each Ad Set to see what works best.
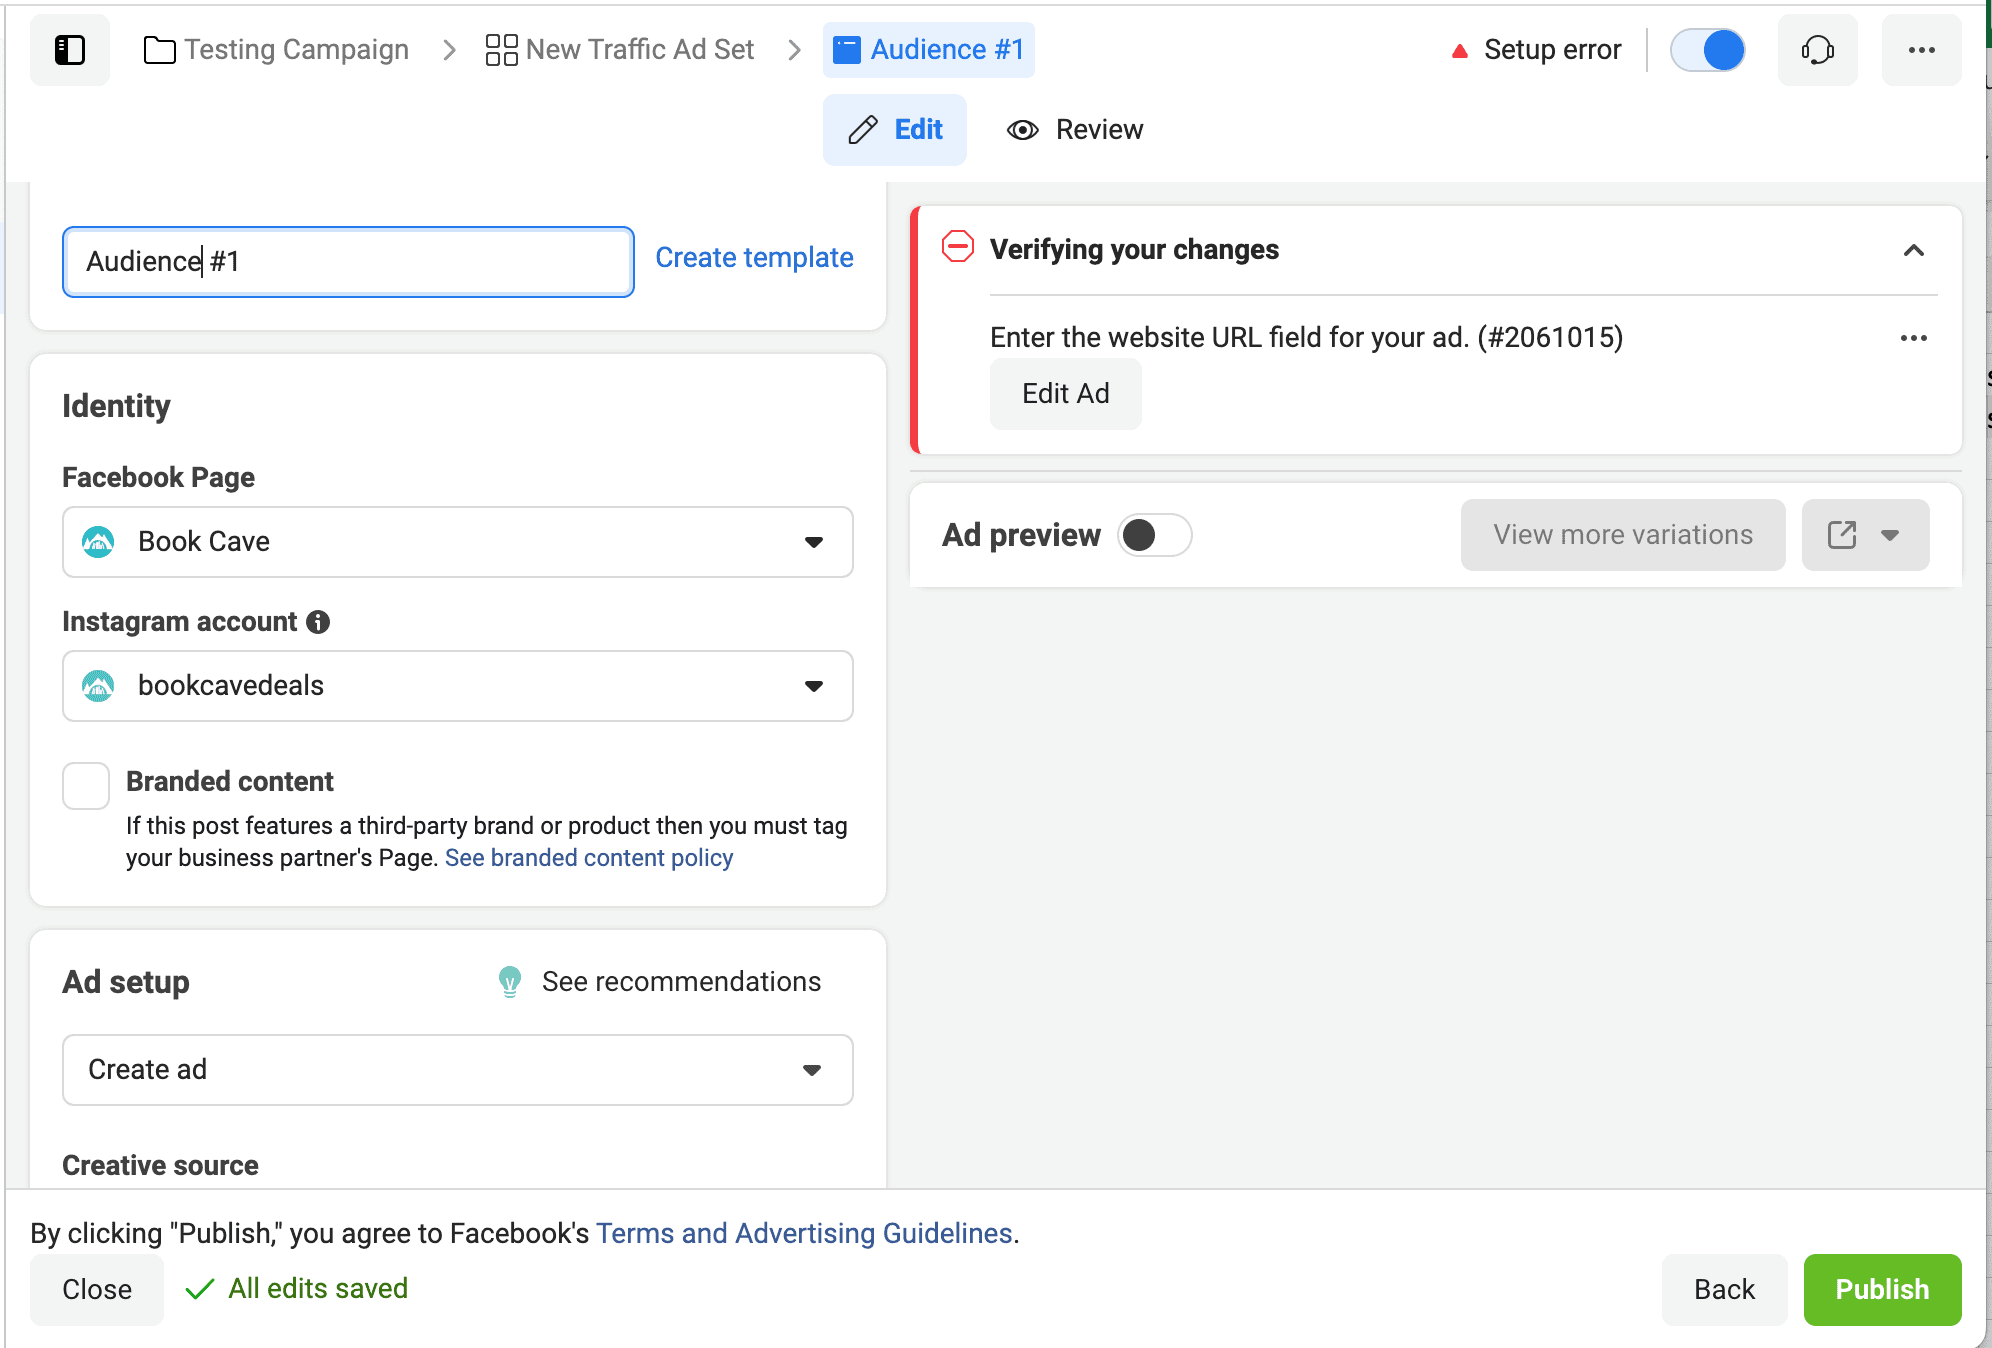
Under “Identity,” be sure it’s pointing to the correct Facebook and Instagram pages for your author Page. If you don’t have an author Instagram account, that option should just say “Use Selected Page.”
Scroll down to the “Ad Creative” section, leaving the other default settings as is. Click the “Add Media” button and choose “Add image” to upload one of the images you created.
Now it’s time to plug in your Primary text, Headline, and landing page URL (in the Website URL field), and choose your Call to Action text (Shop Now, Download, and Order Now are all great options). You can also add a Description if desired—it will appear below the Headline. But remember that simpler is usually better, so don’t use repetitive text.
Turn on the “Ad preview” on the right to see what your ad will look like in different placements. When you’re satisfied, click “Publish”! Don’t worry, this doesn’t actually publish the ad to Facebook; it only publishes it on your dashboard.
Duplicate Your Ad
You want a few Ads in your Ad Set so you can test different images, and the easiest way to do this is to duplicate the Ad you just created and change out the image. You should be in the Ads Manager now, in the Ads tab. Check the box next to the Ad you just made, and click the “Duplicate” button above.
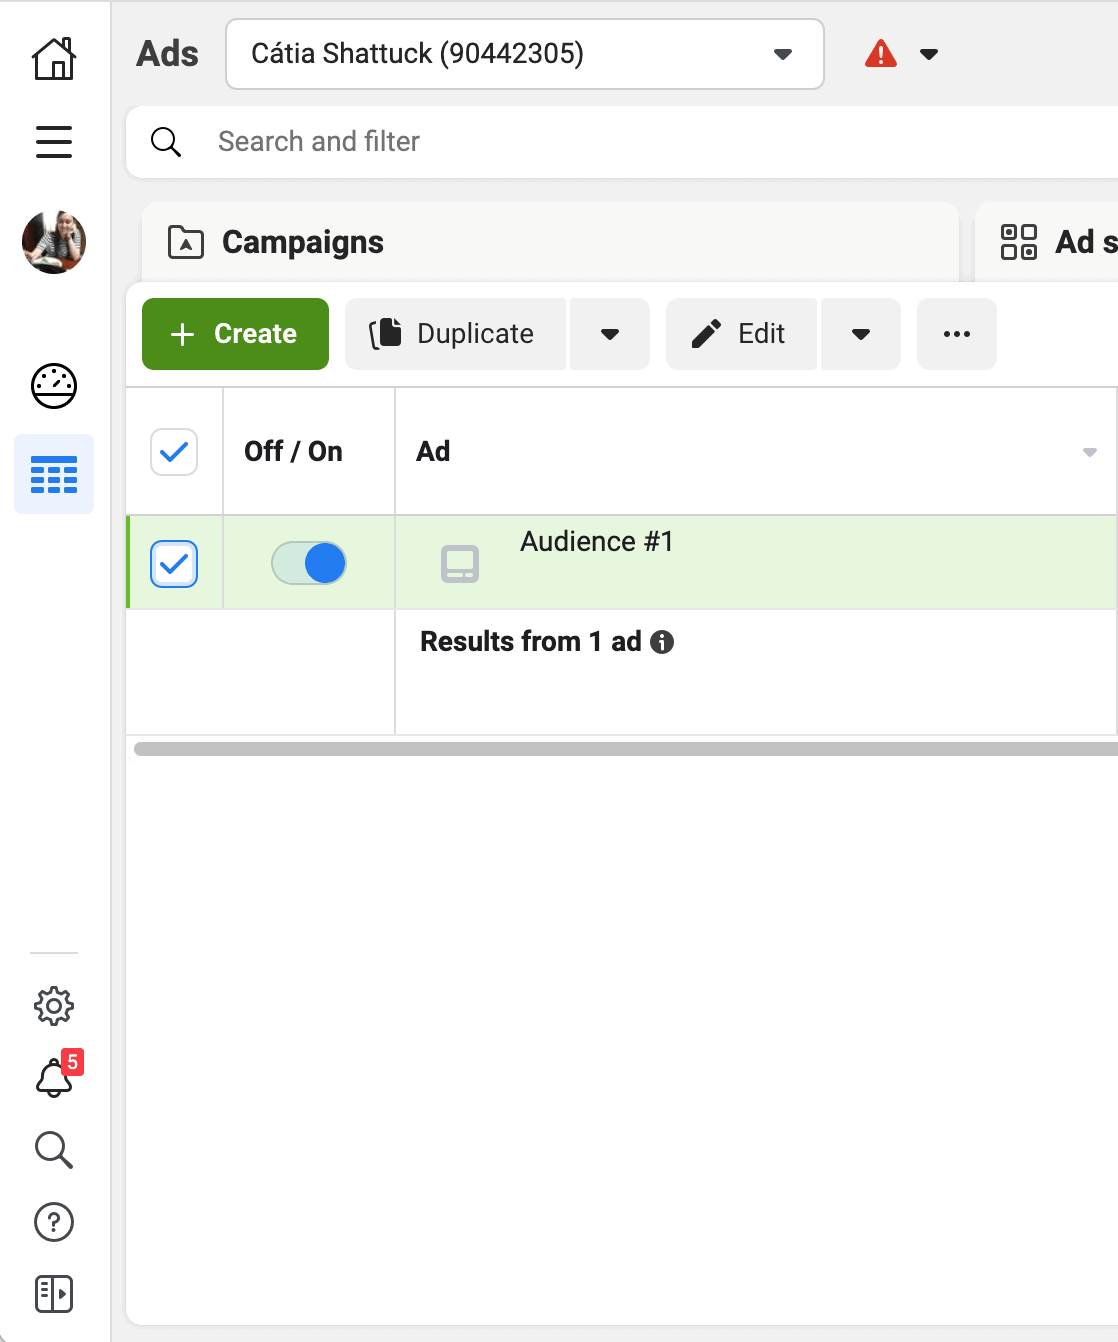
Leave the settings in the popup window as is, and click “Duplicate.”
It’ll take you back to that familiar editing page to edit your new Ad. Change the name to be #2, then scroll down to “Media,” click the “Edit” button, and choose “Change Media.”
You can create as many Ads as you want, but 3 to 6 is a good number for testing purposes.
Once you find the image and ad text combination that works best, then your main focus should be on tweaking and testing your audience. When running ads, you should never stop testing and never stop tweaking. These two things are the most important things to keep in mind if you want to find success with your ads. I’ve been running ads for years, and I always make sure to check on and tweak my ads at least every three days.
Duplicate Your Ad Set
You also want to experiment with targeting different audiences, which means having additional Ad Sets. In Ads Manager, go to the Ad Set tab and, just like we did with the Ad, click the checkbox to the left of your Ad Set, then click the “Duplicate” button.
Change the name of your new Ad Set to reflect the new audience you’re targeting. Scroll down to the Detailed Targeting section and remove the keyword that is currently there, then plug in a new one. Leave the “Narrowing” keywords (Kindle, Kindle Store, etc.) as is.
You’ll then want to adjust the names of the Ads inside this Ad Set to reflect the new audience as well, but nothing else on those will need to be changed.
Publish Your Ad!
When everything looks good, Click the blue “Review and publish” on the top right of the Ads Manager screen. Review your Campaign, Ad Sets, and Ads, then click “Publish.” Your ads will then be reviewed by Facebook before being published, which can take up to 24 hours.
After letting your ads run for about a week, you can review the results and turn off Ads that aren’t performing well, as well as make new Ads or Ad Sets using what you will learn from the results your current Ads are getting. If you’re seeing great results, you can also increase your budget to reach even more people. If often takes people several attempts before landing on an ad set up and design that works well for them. Don’t be discouraged if your first few ads are complete flops.
Have you had success with Facebook ads? Are you just starting to experiment with them? Let us know in the comments below!



Comments